

Painting kitchen cabinets is one of the most cost-effective ways to refresh your kitchen’s look. With the right colors, tools, and techniques, you can achieve a professional finish that rivals a full remodel. This guide covers everything from choosing the perfect paint to capturing beautiful before-and-after pictures to showcase your transformation.
Key Takeaways
- Choose the right paint: Use durable, washable paints like latex or enamel for long-lasting results on kitchen cabinets.
- Prep is everything: Clean, sand, and prime cabinets thoroughly to ensure paint adheres properly and lasts for years.
- Color sets the mood: Light colors make small kitchens feel bigger, while bold shades add personality and drama.
- Capture transformation photos: Take high-quality before-and-after pictures to document your project and inspire others.
- Use proper tools: High-quality brushes and foam rollers help achieve a smooth, brush-free finish.
- Consider two-tone designs: Mix upper and lower cabinet colors for a modern, dynamic look.
- Protect your work: Apply a topcoat or sealant to guard against moisture, grease, and daily wear.
Quick Answers to Common Questions
What’s the best paint for kitchen cabinets?
The best paint for kitchen cabinets is a high-quality latex or enamel paint in a semi-gloss finish. These are durable, easy to clean, and resistant to moisture and grease.
Do I need to prime cabinets before painting?
Yes, priming is essential—especially when painting over dark wood or glossy finishes. Primer helps the paint adhere and ensures a smooth, long-lasting result.
Can I paint cabinets without removing doors?
You can, but removing doors gives a much better finish. It allows you to paint flat surfaces evenly and reach all edges without drips or brush marks.
How long does it take for cabinet paint to dry?
Paint typically dries to the touch in 2–4 hours, but it takes 3–7 days to fully cure. Avoid using cabinets during this time to prevent damage.
What color makes a small kitchen look bigger?
Light colors like white, light gray, or soft pastels make small kitchens feel larger and brighter by reflecting more light.
📑 Table of Contents
- Why Painting Kitchen Cabinets Is a Smart Upgrade
- Choosing the Right Paint for Kitchen Cabinets
- Prepping Your Cabinets for a Flawless Finish
- Step-by-Step Painting Process
- Creative Ideas for Painting Kitchen Cabinets
- Documenting Your Transformation: Ideas for Painting Kitchen Cabinets Pictures
- Maintaining Your Painted Cabinets
- Common Mistakes to Avoid
- Conclusion
Why Painting Kitchen Cabinets Is a Smart Upgrade
If you’re looking to give your kitchen a fresh new look without breaking the bank, painting your cabinets is one of the smartest moves you can make. A full kitchen remodel can cost tens of thousands of dollars, but a cabinet paint job typically costs a fraction of that—often under $500 if you DIY. Plus, it’s a project most homeowners can tackle over a weekend with the right planning.
But beyond the savings, painting cabinets offers creative freedom. You’re not limited to the original wood tone or outdated finish. Whether you dream of crisp white Shaker-style cabinets, moody navy blue, or a cheerful sage green, paint lets you personalize your space. And when you document the process with before-and-after pictures, you create a visual story of transformation that’s both satisfying and shareable.
Another bonus? Painted cabinets are easier to clean and maintain than many people think. With modern paints and sealants, your cabinets can resist stains, grease, and fingerprints—especially in high-traffic kitchens. So not only do you get a beautiful upgrade, but you also gain functionality.
Choosing the Right Paint for Kitchen Cabinets
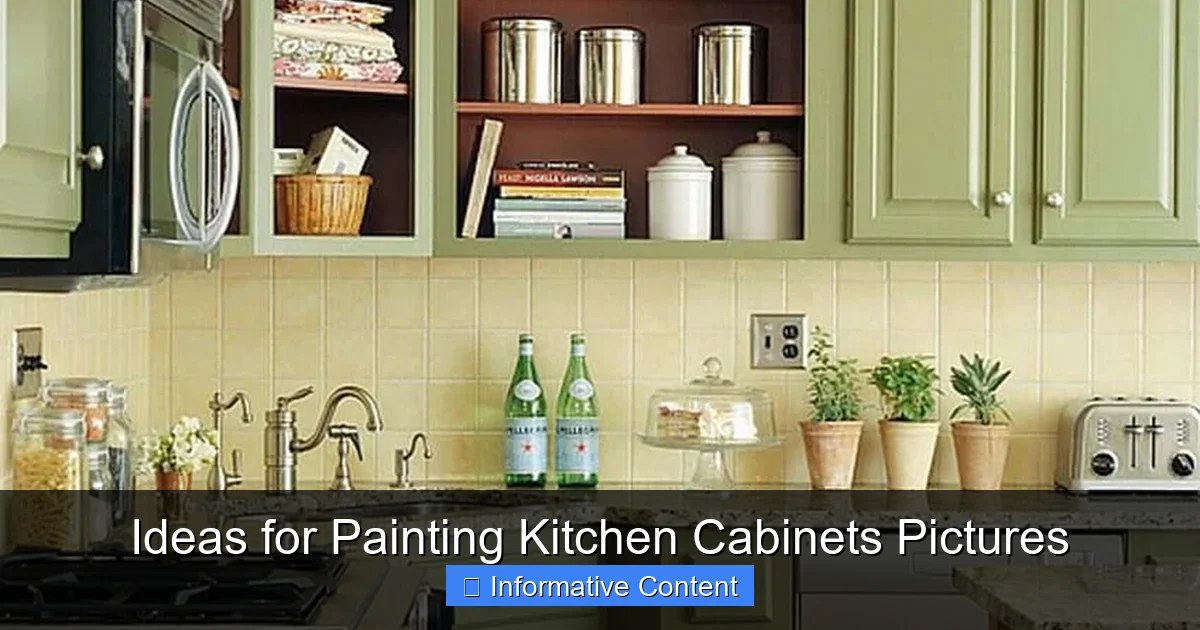
Visual guide about Ideas for Painting Kitchen Cabinets Pictures
Image source: cdn.homebnc.com
Not all paints are created equal—especially when it comes to kitchen cabinets. You need a finish that’s durable, easy to clean, and resistant to moisture and heat. Here’s what to look for:
Best Paint Types for Cabinets
Latex (Acrylic) Paint: This is a popular choice for DIYers because it’s low-odor, dries quickly, and cleans up with water. High-quality acrylic latex paints, especially those labeled “cabinet and trim” paint, offer excellent durability and a smooth finish. Brands like Sherwin-Williams ProClassic or Benjamin Moore Advance are top picks.
Enamel Paint: Oil-based or water-based enamels are known for their hard, glossy finish. They’re extremely durable and ideal for high-use areas like cabinets. Water-based enamels (like Benjamin Moore Advance) are easier to work with than traditional oil-based versions—no strong fumes and easier cleanup.
Chalk Paint: While trendy and easy to apply, chalk paint isn’t the best for kitchen cabinets unless sealed properly. It’s porous and can stain easily, so it requires a strong topcoat like wax or polyurethane. Best for decorative pieces, not high-traffic cabinetry.
Finish Matters: Gloss, Satin, or Semi-Gloss?
The sheen of your paint affects both appearance and performance. Here’s a quick breakdown:
– Gloss: Highly reflective and very durable. Great for modern kitchens but shows every brush stroke and imperfection.
– Semi-Gloss: A balanced choice—durable, easy to clean, and hides minor flaws. Ideal for most kitchens.
– Satin: Soft sheen with moderate durability. Looks elegant but may not hold up as well in humid or greasy environments.
For kitchen cabinets, semi-gloss is the gold standard. It’s tough enough to handle daily use but not so shiny that it highlights every flaw.
Color Selection Tips
Color can completely change the feel of your kitchen. Here are some ideas to consider:
– White: Timeless and clean. Makes small spaces feel larger and brighter. Pair with brass or matte black hardware for contrast.
– Light Neutrals: Soft greys, beiges, and greige tones add warmth without overwhelming the space.
– Bold Colors: Navy, forest green, or deep charcoal create a dramatic, modern look. Best for larger kitchens with plenty of natural light.
– Two-Tone: Paint upper cabinets one color (like white) and lower cabinets another (like navy or black). Adds visual interest and breaks up monotony.
– Accent Colors: Use a pop of color on just one cabinet, like a pantry door or island, for a fun focal point.
Pro tip: Always test your color on a small section of cabinet before committing. Lighting—natural and artificial—can change how a color looks throughout the day.
Prepping Your Cabinets for a Flawless Finish
You’ve picked your paint. Now comes the most important step: prep. Skipping this step is the #1 reason DIY cabinet paint jobs fail. A smooth, long-lasting finish starts with proper preparation.
Step 1: Remove Cabinet Doors and Hardware
Take off all cabinet doors, drawers, and hardware (handles, hinges, knobs). Label each door and its corresponding location with painter’s tape and a marker. This makes reassembly much easier. Store hardware in labeled bags so you don’t lose anything.
Step 2: Clean Thoroughly
Kitchen cabinets collect grease, dust, and grime over time. Use a degreaser like TSP (trisodium phosphate) or a mix of warm water and dish soap. Scrub all surfaces—fronts, sides, and frames. Rinse with clean water and let dry completely. Any residue will prevent paint from adhering.
Step 3: Sand the Surfaces
Lightly sand all cabinet surfaces with 120- to 150-grit sandpaper. This removes the glossy finish and creates “tooth” for the primer to grip. Focus on edges and corners where paint tends to peel. Wipe away dust with a tack cloth or damp rag.
Step 4: Prime for Success
Priming is non-negotiable, especially if you’re painting over dark wood or switching from a glossy finish. Use a high-adhesion primer like Zinsser BIN or Kilz Original. Apply with a brush or roller, and let dry completely. One coat is usually enough, but two may be needed for very dark surfaces.
Step 5: Fill Holes and Imperfections
If you’re reusing old hardware, fill old screw holes with wood filler. Sand smooth once dry. Also fill any dents, scratches, or cracks. A smooth surface = a professional-looking finish.
Step-by-Step Painting Process
Now for the fun part: painting! Follow these steps for a smooth, brush-free finish.
Gather Your Tools
You’ll need:
– High-quality synthetic brush (2–2.5 inches)
– Foam roller (4-inch, high-density)
– Paint tray and liners
– Painter’s tape
– Drop cloths
– Sandpaper (220-grit for light sanding between coats)
– Tack cloth
Paint Application Tips
1. Work in a dust-free area: Paint in a clean, well-ventilated space. Close windows and doors to keep dust out.
2. Use the “roll and tip” method: Roll on paint with the foam roller, then immediately “tip off” with a brush using light, even strokes in one direction. This minimizes roller marks and brush strokes.
3. Thin coats are better: Apply two thin coats instead of one thick one. Thick paint drips, bubbles, and takes longer to dry.
4. Let dry completely: Follow the paint manufacturer’s drying times. Rushing to the next coat can ruin the finish.
5. Lightly sand between coats: Use 220-grit sandpaper to smooth any bumps or dust nibs. Wipe clean before applying the next coat.
Painting Cabinet Frames vs. Doors
– Frames: Paint in place using a brush for edges and a small roller for flat areas. Be careful not to get paint on adjacent walls or countertops.
– Doors and Drawers: Lay flat on sawhorses or a workbench. Paint the edges first, then the front. Let dry face-down to prevent dust from sticking.
Drying and Curing Time
Even after the paint feels dry to the touch, it needs time to cure. Most cabinet paints take 3–7 days to fully harden. Avoid reassembling doors or using cabinets during this time. Rushing can lead to sticky surfaces or chipping.
Creative Ideas for Painting Kitchen Cabinets
Ready to get creative? Here are some inspiring ideas for painting kitchen cabinets that go beyond basic white.
Two-Tone Cabinet Design
One of the hottest trends is the two-tone look. Paint upper cabinets in a light color (white, light gray, or cream) and lower cabinets in a darker shade (navy, charcoal, or forest green). This creates contrast and visual depth. It also helps hide wear and tear on lower cabinets.
Example: White uppers with deep teal lowers and gold hardware. The result? A modern, coastal-inspired kitchen that feels fresh and luxurious.
Ombre or Gradient Effect
For a bold, artistic statement, try an ombre effect. Blend two or more shades of the same color family from light to dark across your cabinets. This works especially well on open shelving or a kitchen island.
Tip: Use a sponge or sprayer for a smooth gradient. Practice on a test board first.
Stenciled or Painted Patterns
Add personality with stencils. Floral motifs, geometric patterns, or even hand-painted details can turn plain cabinets into works of art. Use painter’s tape to create clean lines and apply with a small brush or sponge.
Example: A subtle herringbone pattern in gold on white cabinets adds elegance without overwhelming the space.
Distressed or Chalk Paint Finish
Want a farmhouse or vintage vibe? Use chalk paint and distress the edges with sandpaper after painting. This creates a “lived-in” look that’s perfect for rustic or cottage-style kitchens.
Remember: Always seal with a protective topcoat to prevent chipping.
Color-Blocking with Accent Walls
Paint your kitchen island or pantry cabinet in a bold color that matches an accent wall. This creates a cohesive, designer look. Think emerald green island with a matching backsplash or a burnt orange pantry door against a terracotta wall.
Matte Black for Drama
Black cabinets are sleek, modern, and surprisingly versatile. They pair well with stainless steel appliances, marble countertops, and warm wood floors. Use a matte or satin finish to reduce fingerprints.
Pro tip: Add under-cabinet lighting to prevent the space from feeling too dark.
Documenting Your Transformation: Ideas for Painting Kitchen Cabinets Pictures
One of the most rewarding parts of a cabinet paint project is capturing the transformation. High-quality before-and-after pictures not only showcase your hard work but can also inspire others. Here’s how to take stunning photos.
Before Photos: Set the Stage
Take clear, well-lit photos of your cabinets before you start. Use natural light whenever possible. Shoot from multiple angles:
– Wide shot of the entire kitchen
– Close-up of cabinet doors and hardware
– Detail shots of worn finishes, scratches, or outdated colors
Tip: Clean the cabinets lightly before shooting—just enough to remove dust, not grease. You want to show the “before” truthfully.
After Photos: Show Off the Results
Once your cabinets are painted and reinstalled, take new photos under the same lighting conditions. This creates a true side-by-side comparison.
– Use a tripod or steady surface to keep shots aligned.
– Style the kitchen with simple decor: a fruit bowl, fresh herbs, or a cookbook.
– Capture details: hardware, drawer fronts, and how light reflects off the finish.
Create a Before-and-After Slider
Use photo editing apps or websites like Fotor or Canva to create a side-by-side or slider image. This makes the transformation instantly visible and shareable on social media or home improvement blogs.
Tell the Story
Pair your pictures with a short caption explaining your process: paint color, brand, prep steps, and any challenges you overcame. People love real stories—not just pretty pictures.
Example caption: “Transformed my 90s oak cabinets with Sherwin-Williams Naval (semi-gloss). Spent $200 and a weekend—worth every penny!”
Share Your Journey
Post your pictures on Pinterest, Instagram, or home renovation forums. Use hashtags like #KitchenCabinetMakeover, #DIYKitchen, or #PaintedCabinets to reach a wider audience. You might just inspire someone else to take the leap!
Maintaining Your Painted Cabinets
Your beautiful new cabinets will last for years with proper care. Here’s how to keep them looking fresh.
Cleaning Tips
– Wipe down cabinets weekly with a soft cloth and mild soap.
– Avoid abrasive cleaners or scrub pads that can scratch the finish.
– For greasy spots, use a degreaser sparingly and rinse immediately.
Touch-Ups and Repairs
Keep a small bottle of your paint for touch-ups. Small chips or scratches can be fixed with a fine brush. Let dry and seal if needed.
Reapply Topcoat if Needed
After 3–5 years, consider reapplying a protective topcoat, especially on high-use areas like cabinet fronts and drawer pulls. This extends the life of your paint job.
Common Mistakes to Avoid
Even with the best plans, things can go wrong. Here are common pitfalls and how to avoid them.
Skipping Prep Work
Rushing through cleaning, sanding, or priming leads to peeling, bubbling, or uneven paint. Take your time—prep is 80% of the job.
Using the Wrong Paint
Don’t use wall paint on cabinets. It’s not durable enough. Invest in cabinet-specific paint for a professional result.
Overloading the Brush or Roller
Too much paint causes drips and streaks. Load your brush or roller lightly and apply in thin, even layers.
Not Labeling Doors
Forgetting which door goes where is a nightmare. Label everything before you start.
Reassembling Too Soon
Let paint cure fully before reinstalling doors. Otherwise, you risk smudging or damaging the finish.
Conclusion
Painting your kitchen cabinets is a rewarding project that can dramatically improve your home’s look and value. With the right paint, proper prep, and a little creativity, you can achieve a custom, high-end finish without the high-end cost. And by documenting your journey with before-and-after pictures, you not only celebrate your success but also inspire others to transform their spaces.
Whether you go for classic white, bold two-tone, or a trendy matte black, the key is to enjoy the process. Take your time, follow the steps, and don’t be afraid to experiment. Your dream kitchen is just a paintbrush away.
Frequently Asked Questions
Can I paint over laminate cabinets?
Yes, but you must use a bonding primer designed for laminate surfaces. Lightly sand the surface first to help the primer adhere.
How many coats of paint do kitchen cabinets need?
Most cabinets need two thin coats of paint. Always let the first coat dry completely and lightly sand between coats for a smooth finish.
Is it worth painting cabinets instead of replacing them?
Absolutely. Painting costs a fraction of replacement and can give your kitchen a completely new look. It’s a great way to update without a full remodel.
Can I use chalk paint on kitchen cabinets?
You can, but it requires a strong sealant like polyurethane or wax. Chalk paint is porous and not ideal for high-moisture, high-use areas unless properly protected.
What’s the best way to avoid brush marks?
Use high-quality brushes and foam rollers, apply thin coats, and use the “roll and tip” method. Lightly sand between coats to smooth imperfections.
How do I choose between oil-based and water-based paint?
Water-based paints are easier to clean up, low-odor, and dry faster. Oil-based paints are more durable but have strong fumes and longer drying times. Water-based enamels are often the best compromise.